Tuesday, July 26, 2005

Pedalboard Part Two


These are the pins that hold the pedals in place. The second picture shows how the leather had been worn off and dried out over the last few decades. The first picture shows the pins before and after I sanded the old leather off. Tomorrow I will glue on new leather and replace the pins in the frame. After that, I just need to wash the pedals themselves and replace them.

Pedalboard Part One


Today was a wonderful day...only 71 degrees....it felt cold!

But anyway, today I started on the refurbishing of the pedalboard. Nothing like 97 years worth of grime to make a guy want to clean something!

In this picture, the topboard from the back of the pedalboard has been removed as have the spacer bars- leaving nothing but lots of dirt and 97 year old felt pieces.

The dirt is evident from the very visible rings on the spacer bar. Remember, this was facing DOWN for the last 97 years.

Monday, July 25, 2005

A Great Cloud of Witnesses


Hello all, for those that don't know what "The Stone Church" looks like, this is for you. I won't reveal the location of the church here for security reasons, but I did want to point out a few interesting things.

"Therefore, since we are surrounded by such a great cloud of witnesses, let us throw off everything that hinders and the sin that so easily entangles, and let us run with perserverance the race marked out for us." Hebrews 12:1

The foundations of the Stone Church predate the Civil War, with the completion of the stone section immediately following. It is my understanding that the entryway/bell tower was added at a later time (as was the wooden sections at the rear of the building). It appears that the cemetery started to the right of the church and has worked its way around over the last 150 or so years. To the left of the church, and out of the photograph, is again as much cemetery. The oldest grave I found in my brief time there was 1859.

Another bit of amusing history is the fact that the building was actually constructed on the dividing line between two townships. The story is that it was placed there so that there would be no division as to which township the church was in. As you can see in the second picture, there is no dividing line down the center aisle at the present time!

The second picture is there to show the interior and the location of the new/old instrument. It will be placed approximately where I am standing. It will fill the space between the wall and the heat register and come forward about six feet; which is about two feet in front of where I am standing. In the picture I am trying to hide the H****** instrument. (That is a dirty word when you are an organ builder!)

I particularly like the altar/reredos. It is a marvelous piece of woodwork and American Folk art. The parent church is to be commended for its desire to preserve its history and share it with everyone.

Saturday, July 23, 2005

Pedal Chest and Board


Yes, work continues even with a rogue VCU on the loose........

One the left is a picture of the pedal chest. Once again it is upside down and the pallets are showing. This chest does not have sliders as only one rank is placed on it. The stop is controlled by a ventil.

Ventil: A valve that admits or denies wind to a set of pipes. It may control just one set (as in American organs of the last several centuries) or several sets (most often seen in French Organs of the 1800's and 1900's where the reeds were so controlled.)

In a Ventil chest, the individual note pallets open whenever the key or pedal is pressed. The ventil controlls whether wind is present or not. When there is wind, there is noise. The pallets and pallet springs are somewhat visible in the picture. (Inexpensive digital camera and unsteady hand, sorry)

The center picture shows the pedalboard in front of the instrument. This pedalboard will be completely taken apart, cleaned, new felt added (for noise reduction), and reassembled in the rebuilt instrument.

Also visible laying on the insulation bags are the case posts. I was holding one of these in an earlier post. The back side of the pedal chest is also visible at left.

Friday, July 22, 2005

VCU Malfunction.......


Here the VCU (Vermin Control Unit) mentioned in a previous post has malfunctioned and determined that yours truly is vermin and needs to be controlled.

This particular VCU is also known as CAT (contantly attracting trouble).

Also, the pedal windchest has been extracted from the pile and restoration has begun there as well. I will have pictures later this weekend.

Wednesday, July 13, 2005

A Lot of Air......


This is the back of the instrument. This particular instrument was hand pumped for the first half century of its life. Yep, it took two people: one to pump and one to play.

Basically, you just raise and lower the pump handle. It is attached to two bellows underneath the reservoir. One is always discharging wind and the other is drawing in air. The springs that provide the pressure are also visible.

It is not that hard to pump, unless you have an organist that likes to play big chords with all the stops on.......

The opening for the electric blower still exists. The purchaser has not decided if they will install the blower or just use the pump.

I will say this though: this gives a whole new meaning to the term: "aerobic exercise."

Springs and Things....


Here is a shot from the side. You can see the four rows of pipes on top. Also, the bellows at the bottom is visible. Those are springs on top of the reservoir. They provide the pressure to regulate the wind.

The piece going up at an angle is a wind trunk. It is made of wood and is bent in all three dimensions. A master woodworker put it together.

We Have Pipes!


Well, here is what it looks like today...we finally finished all the chestwork. Now we get to put the pipes on.

Front Center: 8' Open Diapason
Front Sides: 8' Open Diapason Bass
Middle (behind Diapason):
8' Dulciana
Rear: 8 Melodia Basses and Trebles (small pipes in center near rackboard.)

There is also a 4' Octave and a TC 4' Flute D'Amour that have not been placed yet. The Melodia and Octave have divided compasses. That is, there are two stops for each set. Pull the "Bass" stop and only the bottom 12 pipes play, pull the "treble" stop and everything above the thirteenth key will play.

Tuesday, July 12, 2005

Bridging the Gap.....

This is a shot from the back of the instrument looking over the keyboard in the front. The rods coming down from the top of the picture are connected to the pallets in the windchest. At the front of the rocker arms a sticker will be inserted to complete the connection between the key and the pallet.

A Keyboard


This was the keyboard on the ground.

This is the keyboard in its proper place. You can just make out the holes for the drawknobs on the side. Each key will also have a little vertical slider called a sticker at the back to connect it to the pallets.
Sticker: A vertical tracker. Usually used when the distance travelled is less than 6 inches.

An Interesting Aside.......


One the side of the windchest are the slider rockers. These pieces of wood fit into a hole in the slider and change the back and forth motion of the drawknob into side to side motion for the sliders.

Drawknob: The lever on the console that opens or closes a set of slider holes. This is usually done mechanically by means of trackers and squares.

Last of the Chestwork


Howard is using a vacuum set to blow to clean out the channels of the windchest. You can see the slider to the left. The slider moves back and forth to either align or block the holes. If there is air, there is noise. The groves in the windchest are also known as channels. Their purpose is to allow excess wind or (in some OTHER builders instruments) leakage to flow without getting into the wrong pipe. Trust me, that is a bad situation!
On the left Jerome is using the rocker arms to pull the pallet open to let the air and junk out.
In Jerome's picture, the levels of the windchest can be seen. Beneath are the rocker arms, then there is the windchest proper (The area above Jerome's hand is usally sealed) , the pallets, the channels are not visible, then the sliders, toeboards, and rackboards.

Monday, July 11, 2005

Flipped Again!


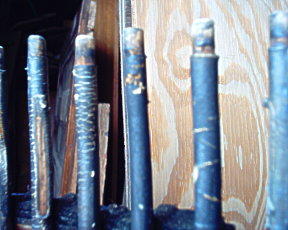
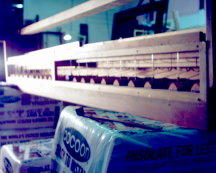
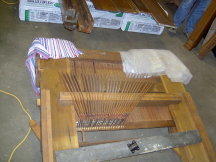
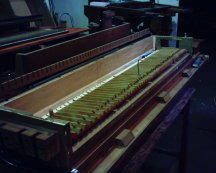
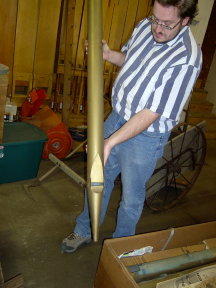
Things really fly at times...we have the windchest righted and on its frame. We are no ready to look at the top of the unit. It is so pleasing ( and a HUGE relief) to see that this area is in nearly perfect condition also.

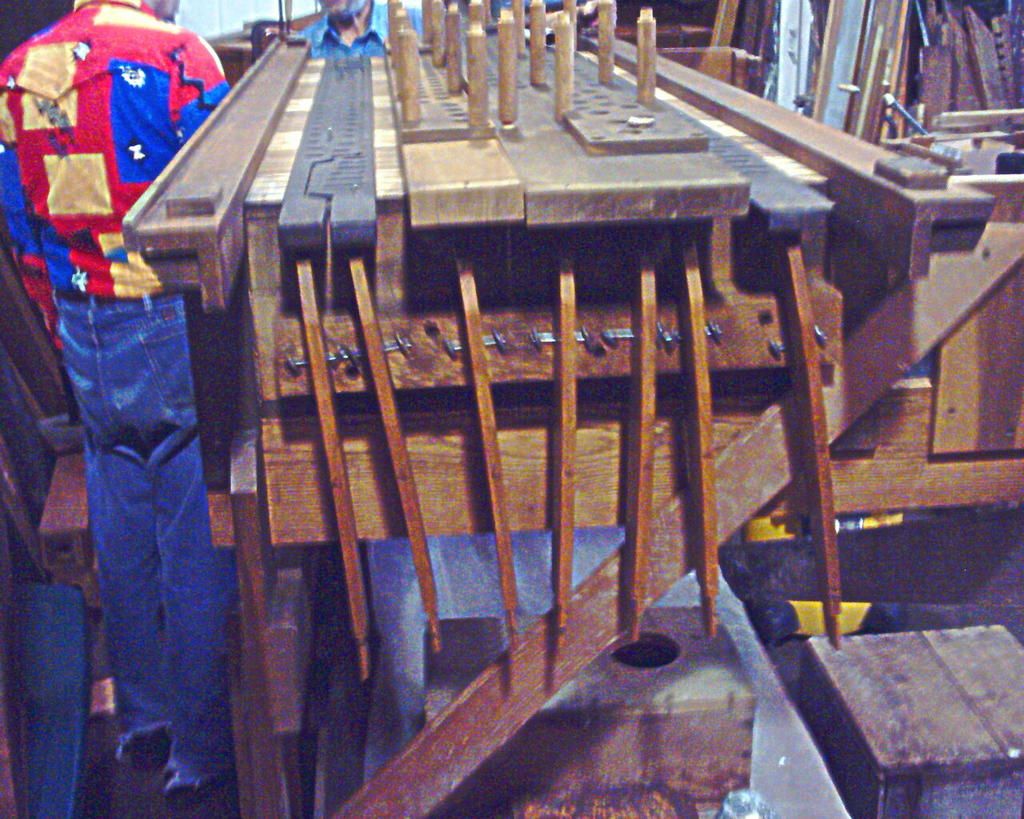
This is the heart of the instrument. When the pallet underneath opens up it lets air into the channel. If the slider (black thing) hole lines up with the channel hole, wind flows and the pipe speaks. If it doesn't, well, it doesn't.

Channel: In a tracker windchest, the area immediately above the pallet. All the pipes that could possibly sound on that note are arranged so as to sit on channel holes on one channel.
Channel Hole: The hole beneath the slider hole. If the pallet is open air tries to move through the channel hole.
Slider: A piece of wood or phenolic with holes drilled at specific intervals. All the pipes of a rank are arranged on one particular slider.
Split slider: A slider that has two sections, so that one may be moved without disturbing the other.
Slider Hole: A hole drilled in a slider. It is placed in such a way so that all the holes on a slider will either match their specific channel hole or block it.
Speak: When referring to an organ pipe, to speak is to make a sound (hopefully pleasant)

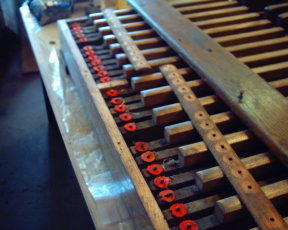
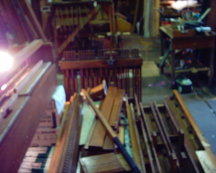
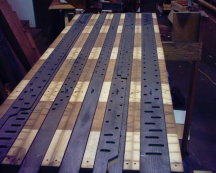
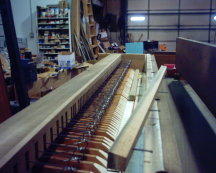
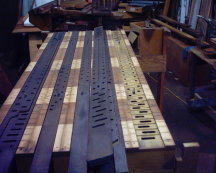
In the second picture above, I have moved a slider aside to show the channel holes underneath it. The slider holes can either match the channel holes and allow the pipes to speak or block the holes, and thus the air, to prevent the pipes from speaking.

Trackers (not the Geo/Chevy version)


This is a shot of the trackers laying on the floor of the shop after sorting. I feel another definition coming on.......

Tracker: the physical device (usually a long thin piece of wood) that connects the key to the pallet.

An instrument can have many trackers, and it may take several trackers connected by squares to get from the key to the pallet.

Square: A wood or metal device that changes the orientation of the physical energy carried by trackers.

Several are warped or broken. The broken ones that can be repaired will be and the others will be replaced with new wood inthe old style. The warped ones will be straightened by hanging them with a weight at the bottom. Steam is then applied to relax the wood.

That is NOT a cat at the top of the picture, it is the company Vermin Control Unit.

More Pallets


Here are some additional pictures of the Pallet area of the windchest. In the second the top (bottom!) board is attached and the pallet springs are in place. These hold the pallet closed against gravity and the wind. Remember the whole windchest is upside down right now.

Finally Moving on the Project.....


After several weeks of other stuff taking priority, the Stone Church organ is now first on the list. We were very anxious about the condition of the inside of the windchest. (the heart of the organ) one or two problems here and the whole organ would be ruined.

After getting the frame set up and the windchest finally on it. We immediately flipped the windchest upside down and began taking it apart. Imagine our surprise to find the inside looking like this. This looks nearly brand new! (This was built in 1907, folks!) Notice how clean the leather looks...there is no abnormal wear and it is almost as flexible as the day it was installed.

Oops, waxing eloquent and I forget to explain a few things. So here are some organ terms defined:

Windchest: the box that contains the pressurized air (known as "wind") and mechanism for releasing that air to the pipes at the appropriate time. The pipes sit on the top and it is connected to a reservior.
Reservior: a box with a flexible top used to maintain a set air pressure no matter how many pipes are playing at one time.
Pallet: the supports and sealing surface of the device that blocks or allows air to the pipes. Located inside the windchest.
Wind:
Pressurized air to make the pipes speak (sound). Usually provided by a blower, but may also be provided by a bellows.
Blower: A motorized fan to provide wind to a reservoir.
Bellows: A hand pumped leather bag used to provide wind to a reservoir.

So there is pressurized air (wind) inside the reservoir and the windchest. The pallet opens and allows air to enter the pipe to let it speak. In the picture above, this entire area is covered and sealed. It is the bottom of the windchest and the pipes would sit on top.

More Pictures!


Well, here is me holding a piece of trim work in the middle of the pile of stuff. Everything down the center of the shop belongs to the stone church organ. Sorry, the big wood pipes at the back afe not part of it....the belong in a theater organ, but that is another blog......

The second picture is me holding some of the trim work. The closer view shows some of the wonderful detail work. The flower in the wood near my left hand is not machine made, it is hand carved into the block of wood......and the dentils onthe other piece are placed individually, by hand I might add.

Pictures!


Well, here are the pictures I promised last time.

The first one shows yours truly holding one of the facade pipes for the instrument. While it might look pretty in gold, in actuality, it is icky. (Technical term, I know) These pipes have actually been repainted three times. There are traces of the original still visible to the naked eye up close. It has not yet been decided how we will treat the facade. (hint hint: we will NEED to know soon!)

The second image shows the keyboard unit upside down on the floor. Actually, that is the only way to store it because it would fall apart if we flipped it over. When it is not installed, it has no way to hold it together..... it depends on the case of the organ to do that.....should be interesting to see how on earth we are going to get that in place without losing something.........

Resurrection!

Hello!

Well, the "Stone Church" organ is out of storage and ready to be reassembled. I thought that I would create this blog so that anyone interested in this process would be able to follow along more easily.

This is the first time that I have done this, so hang with me while I figure all of this out.

I will post some pictures of the instrument in pieces when I can process the photos.